Showing posts with label homemade. Show all posts

Sunday, 17 April 2016

Nigerian Puff-Puff/ Ghanaian bofrot

Hi Guys!!

Hope you had a wonderful week?...I sure did.

Ever had one of those days when all you want to eat is something fried, hot, soft and yummy, something from home that would be perfect for the horrible spring weather (cold and wet) we are having here. Well, fried yam came to mind first, but I just wasn't in the mood to go looking for yam tubers here in Sheffield.

So, I decided to try out a recipe from way back. Funny thing is, I might probably be the first or only Nigerian child that never actually had puff puff made at home. I'm not sure why, but for some reason, I don't remember my mum making it for us. I remember having it as a child though because one of my uncles bought it from a hawker on the street. 


I didn't eat it again until I went to Ghana. Its actually called 'Kose' in there, its made into very huge balls and is usually served as breakfast with some 'koko' which is pretty much very light and watery 'pap/akamu' in Nigeria.  From the kose-seller down my street, you would probably get about two huge balls of 'kose' with about a cup of 'koko' and that was a very filling breakfast... trust me!

So, I decided to re-create those fond memories of 'kose/ puff puff' without the koko/ akamu in this recipe, and make mine a bit more playful, and small for portion control. 

So heres how I made it.

Ingredients
  • 1tbsp of yeast
  • 2 cups of flour
  • 1tsp of nutmeg
  • 1/2 cup of warm water
  • 1/2 cup of warm milk
  • 1tbsp of sugar
  • 1 tsp of salt
  • 1 egg (optional)
  • 1 tsp of pepper
  • 2 litres of oil for frying
Instructions
  1. In a bowl, place the flour, salt, nutmeg, egg (optional) and pepper then mix together. It might became sticky and almost doughy if you add the egg, if not it would just be the dry ingredients.
    Flour in the bowl

    Adding the nutmeg

    Adding salt into the flour and nutmeg
  2. Add the cup of warm water into the cup of milk, add the sugar and mix. Then add the yeast and allow it to activate for about 5 minutes.
    Yeast being added to the warm milk and water

    Activating the yeast
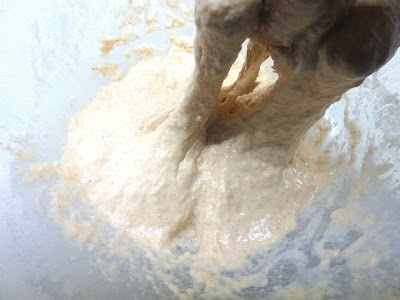
  3. Gradually add the yeast mixture into the dough or flour mixture and mix till it becomes slightly runny and sticky. 
    Adding the yeast into the flour


    Sticky batter
  4. Cover with a cling film or towel and place in a warm place for about 20 minutes.
    After 20 minutes, bubbles begin to form in the batter
  5. Place the frying oil in a deep pot and allow it to heat up.
    Heating up the oil
  6. Scoop the batter into the hot oil, and allow it to fry until it puffs up in the pan and the bottom begins to turn golden brown. Then flip it over and allow the other side to turn brown. (Mine had funny shapes...lol)
    Placing the batter into the hot oil

    Flipping one side over
  7. Remove from the oil, and serve immediately.


Sunday, 3 April 2016

Lemon & Blueberry Drizzle Cupakes

Hi Guys!!

Hope you all had a wonderful week?

This post is so long overdue b'cos certainly taken me a while to perfect this recipe cos theres nothing worse than a dense lemon drizzle cake, but thankfully but its finally here.

I'm going to tell you how to make my delicious lemon drizzle cupcakes. In this era of fit-fam and healthy lifestyles, I've decided to stop making big or whole cakes, and to just stick to cupcakes. It actually helps with my portion control, and I don't have to starve myself of the sweet things in life (...like this delicious cupcake).

They are perfect as desserts especially if you are craving something a bit sweet after dinner, and they are also perfect as gifts when topped with some lemon frosting or just a lemon glaze (lemon juice + icing sugar). Which ever way you want to present it, you're sure to get a lot of wonderful comments about it.


The tangy lemon with the sweet honey, and of course that burst of blueberry freshness, makes this cake the perfect treat. So here's my  recipe.


Ingredients
For the cake part:

  • 1/3 cup of almond flour
  • 1/2 cup of self-raising flour 
  • 1 lemon (zest)
  • 1 stick of butter
  • 2 eggs
  • 3 Tbsp natural yoghurt or milk
  • 1 tsp mixed spice (nutmeg+cinnamon+cloves+ginger)
  • 1/2 tsp salt
  • 1/3 cup sugar
For the filling
  • 1/2 cup blueberries
For the drizzle

  • 3 Tbsp honey
  • 2 Tbsp lemon juice
Instructions
  1. First make the drizzle by combining the lemon and honey and set aside.
  2. Pre-heat your oven to 180 degrees celsius, and line your cupcake tin with liners.
  3.  Into a bowl, cream together the butter and sugar until its pale, then crack in the eggs (one at a time) and mix well.
    The butter and sugar in a bowl

    Creamed butter and sugar
    Eggs added to the butter and sugar cream
  4. Then add in the zest and juice of one lemon. Then add in the almond flour, self raising flour, mixed spice, salt and mix well. Finally add the yoghurt and mix until creamy.
    Almond flour and self raising flour added
  5. Add in the blueberries, and mix.
    Blueberries added to the mixture
  6. Scoop the mixture into the cupcake liners and place in the oven for 15 minutes or until a toothpick inserted comes out clean.
    Greased muffin tin and scooped cupcake mix
  7. Once the cupcakes are done, bring them out of the oven, and place them on the work surface.
  8. Using a toothpick or fork, carefully poke holes into the cupcakes, then drizzle the lemon and honey mixture over it.
    Poking holes into the cupcakes right out of the oven

    The drizzle mixture and cupcakes

    Pouring the drizzle mixture over the cupcakes
  9. I prefer to put them in the fridge for about 30 minutes, to allow it all soak up, then serve.
Tips
  1. Don't worry if the eggs and butter mixture split, just ensure you mix it well, it would still turn out great.

Sunday, 21 February 2016

Homemade Pasta (From Scratch) without the machine

Hi Guys!!

So, if you've read my last post on the molten larva cake, you'll see that I was going to teach Maria how to make some homemade pasta for her new guy. To kinda give them that 'Lady and the Tramp' moment. (#singing- Oh, this is the night, its a beautiful night, and we call it bella notte).


To me, there are very few things in the culinary world more sexy than fresh homemade pasta. If you've ever made your own pasta from scratch....TRUST ME!!...you won't want to eat those store bought ones again. The difference is just sooo clear.


Surprisingly, its very easy to make with just a handful of ingredients....I'm talking just 1, 2, 3 actually! There are usually two methods used, one is certainly more time consuming than the other (Italian grand mother style), and can certainly deter you from pasta making all together. The other one is so easy, you can actually sip some wine as you make it (thats my favourite). So, I'm going to show you how I make mine.


Here goes:

Ingredients
  • 1 cup of flour and extra for dusting
  • 1 Large egg or 2 small ones
  • 2 tbsp of olive oil
  • A pinch of salt (optional)
Other things you'll require include
  • A food processor
  • A roll of cling film
  • A clean tea towel (dampened)
  • A pasta machine (or rolling pin)
  • A knife
  • A clean work surface
  • Your choice of tomato stew and garnish
Instructions
  1. Mix the flour and salt together, and place in the food processor.
  2. Then add the egg and olive oil into the food processor, and begin to pulse. It can also be done in a bowl or table-top (grandma style). If the dough becomes too sticky, add a little more flour. It should eventually form a very soft dough.

  3. Remove the dough from the processor, and place on a lightly floured surface, and begin to knead. Kneed for about 10 minutes  and continue to add more flour little by little until it stops sticking to your hands and work surface, and it becomes smooth and elastic.
  4. Wrap the dough in cling film to prevent it from drying out, and allow it to rest for about 30 minutes.
  5. Once the dough has rested, remove from the cling film and place on a floured surface. 
  6. Using the rolling pin, roll out the pasta very thinly, it should be as thin as a paper. Pick it up and turn it around, to prevent it from sticking to the surface. If you have a pasta machine, this should be easy. If not, its going to require a lot of elbow grease.
  7. Once the dough is flat enough, flour it generously and fold it overlapping each other. 
  8. Use the knife and cut about 1/2 inch pieces.
  9. Then open up the pieces and flour generously.

  10. Put a pot of salted water on the stove, and bring to a boil.
  11. Put the pasta into the water, and allow to cook for about 3.5minutes, not more than 4 mins, or until its al dente. You can start on the tomato sauce now....we decided to use some tomato stew I made earlier.
  12. Remove from the water and set aside.
  13. Put the sauce in pot or pan and heat it up. Then add the pasta into the sauce, and mix.


  14. Then transfer into a bowl or plate, garnish with some parsley or coriander and of course in true Italian style, shred some parmigiano-reggiano cheese onto the pasta....Enjoy!.