Showing posts with label bread. Show all posts

Saturday, 13 February 2016

Sweet potato flat bread (Roti) - An accompaniment to the spicy chicken wings

Hi Guys!!

Two years ago, I had to go to India for an embryology course, and one of my favourite memories of that trip to was the room service (believe it or not). The room service guys pretty much knew me by name at the end of my stay. I pretty much ordered the same thing over and over again, just cos I loved it. 'Chicken lollipops' and 'buttered naan', was my favourite meal. I've made naan bread before, and I really liked it, but I kinda wanted a twist to it.

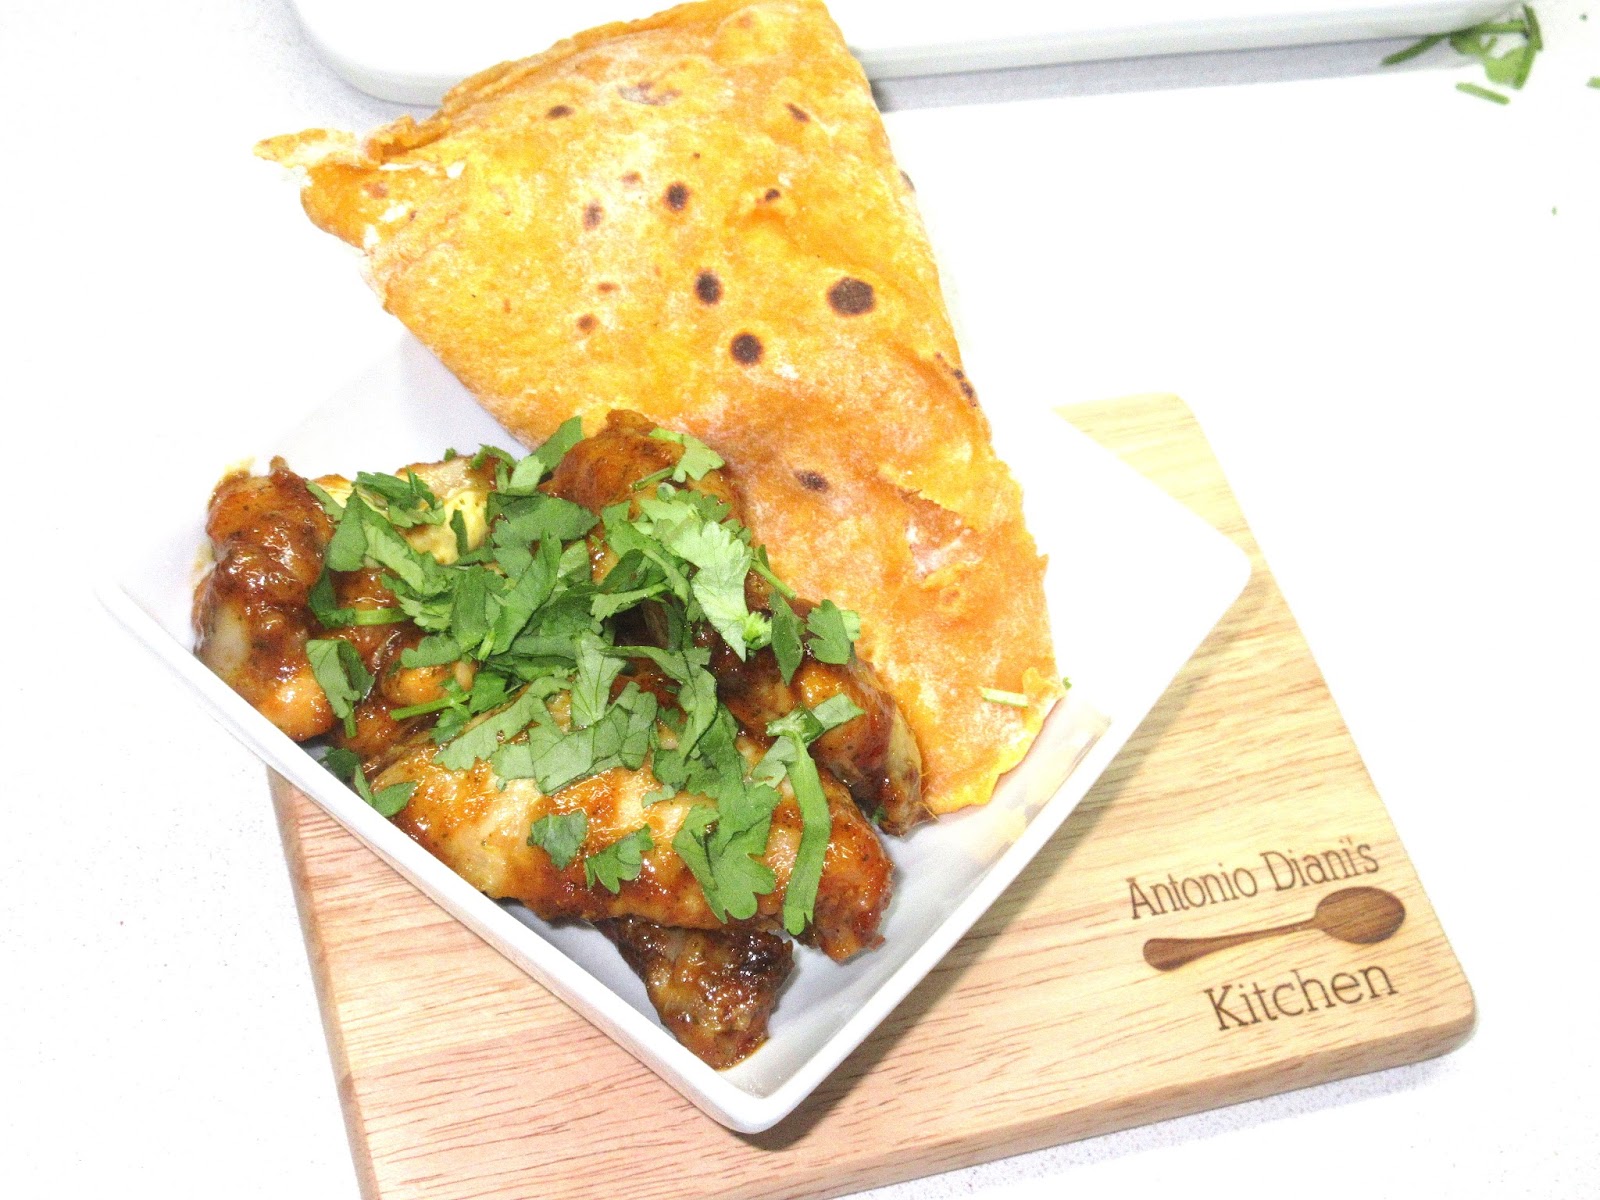
So, I decided to make some flat bread also called 'Roti', but this time around I made it with sweet potatoes. Its so warm, chewy, not heavy and very versatile. I enjoyed eating it straight from the pan, but I also used it as a wrap for my spicy chicken wings. Its such a simple recipe with just two (2) ingredients.


So heres how I made it.

Ingredients
  • 1 cup of flour
  • 1 cup of sweet potato
  • A pinch of salt (optional)
Other things you'll need include;
  • A rolling pin
  • 1 extra cup of flour 
  • A frying pan (crepe pans are better)
  • A clean work surface
  • A tea towel in a bowl to keep the roti warm and soft
Instructions
  1. Bring a pot of water to a boil, and some salt, and then add the sweet potato tubers. You don't have to remove the skin, as it would peel off easily when tender.
    Sweet potatoes being boiled
     
  2. When the potato is fork tender, remove it from the boiling water and peal off the skin.
    Peeled sweet potato
  3. Mash the potatoes and allow to cool, for some minute (cos we are going to handle it while its still hot).
    Mashed sweet potato
  4. Put the potato in a bowl and add the flour. Mix well, until well combined.

    Flour and sweet potato being mixed (early stages)
  5. Sprinkle some flour on the work surface, and kneed the dough until the flour is well incorporated. Then form into a log.
    The log-snapped dough
  6.  Cut out 5- 6 pieces from the log. Roll each piece into a ball.
    Slicing the log into 5 pieces

    Forming them into balls
  7. Sprinkle some flour unto your palms and then flatten the balls. Then transfer them into a floured bowl.
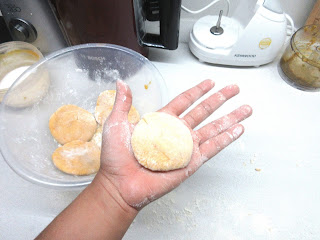
    Flattening the balls with my palms

    Flattened balls, stored in a bowl
  8. Using a rolling pin, flatten the dough balls until they are pretty much the size of a crepe (2mm thick).
    About to roll the balls

    Flattened dough in stacks
  9. Place the frying pan on the heat and transfer the crepe-like dough onto the pan. It should puff up slightly if there are no holes in the dough (unlike mine that had many...lol).
  10. When the roti is browned enough, remove from the pan and place in a bowl lined with a tea towel and cover to keep warm. Repeat the steps until you've exhausted all the dough.
  11. Serve while its warm, Enjoy!

Tips
  1. Try not to over work the dough, as it would become sticky and you'll need to add more flour. This makes for a very chewy roti, which isn't too good.
  2. Ensure your palms are well floured before rolling the balls, as it would be quite sticky.
  3. Theres no need to oil the pan, but if you want to you can.


Sunday, 31 January 2016

Simple Sandwich Rolls

Hi Guys!

Hope you had an exciting week? So sorry the post is coming up a bit late, but better late than never right?

So, although I'm really trying to get onboard the fit-fam band wagon and all, I (like almost everyone else in the world) still love a good sandwich roll. I had some left over sausages in the fridge, but no bread rolls to eat it with, and thats when I had my little light bulb moment, why not make my own sandwich rolls? The inside would be milky and delicious and it would have a crunchy crust....kinda like a really short delicious baguette.
Its a really simply recipe, with just about 5 ingredients. Of course you'll probably have to do some waiting for the dough to rise, but apart from that, its incredibly easy and delicious. 
For this you would need:
Ingredients
Yeast, flour, sugar, salt and warm milk.
  • 1.5 tbsp of yeast
  • 1 cup of warm milk (can be substituted for water)
  • 2 cups of bread flour (all purpose would work too)
  • 1 tsp of Sugar (to feed the yeast)
  • 1 tsp of salt

Other things you'll need include:
  • 2 tbsp of oil
  • A knife
  • A baking tray
  • Parchment paper
  • A clean floured work surface
  • A bowl
  • A dough -hook attachment mixer (optional)

Instructions

  1. Put the yeast in a bowl and pour over the warm milk (or water) and sugar, and leave to activate for about 5 mins, then add the salt.
  2. Add the flour and begin to mix until a dough forms. The dough should come away from the bowl, and should be easy to pull away from the dough-hook.
  3. Transfer the dough onto the floured work surface, and knead for about 4 minutes.
  4. Grease the bowl with the oil, and transfer the dough to the oiled bowl. Rub the dough in the oil, cover with a clean kitchen cloth, and place in a warm place (inside a turned-off oven) for about 1 hour (or till it doubles in size).
    The dough has doubled in size
  5. Deflate the risen dough and place it on the work surface. Form the dough into a rectangle, and cut it into squares.
    The rectangular dough has been cut into squares
  6. Take each square and roll it around in-between your hand and the surface till it becomes a round ball. 
    Using my palm and the work surface to form a dough ball
  7. Transfer on to the baking tray, cover, and allow to rise for about 10 minutes. Now pre-heat your oven to 200 degrees celsius.
    Rolled dough balls
  8. Once its risen, take them and flatten each ball into a rectangle with your fingers.
    Used my finger to flatten the roll
  9. Then roll it up, and seal the edges.
    The flattened dough has been rolled
  10. Place the side of your palm on the edges and make into a pointed end. 
    The edges are pointy
  11. Do this for the rest of the dough ball, cover and allow to rise for another 15 minutes on the work surface.
  12. Before you put them in the oven, use the knife and make a straight line diagonally across the side of each dough roll (don't cut through the dough). Then spritz each roll with some water (this helps create a crispy skin).
    The diagonal slant is done, and the dough is has been spritzed 
  13. Place the rolls in the oven for about 25 minutes. Turn the tray around in the oven at the 10 minute mark to get an even crust on both sides.
  14. Once the rolls are brown and done, remove from the oven, and allow to cool a bit. (If your like me, you'll wait till its just luke-warm and smother some butter across it). Enjoy!!
    Fresh out of the oven


Tips

  1. You can tell that your yeast is spoilt if it doesn't get activated i.e it doesn't turn the liquid frothy after 5 minutes.