Sunday 31 January 2016

Chicken Light Soup (Ghanaian)

Hi Guys!

So, the other day I was talking to a good friend of mine in Ghana. Apparently, I had just interrupted his lunch. He was chowing down on some fufu and light soup (goat meat), and had to pretty much dismiss me, cos he was like he just couldn't talk at that moment. After I hung up, I actually had a good laugh cos I could remember doing the same thing to him when I was in Ghana. Hopefully he doesn't decide to get me back for outing him like this....lol.
Fufu and light soup (chicken or goat meat), is certainly my favourite Gh food. It was actually also the first Gh meal I ever had. Its so delicious and hearty, it just glides down your throat; you really do not want to be disturbed while eating it. To a Nigerian however, light soup is pretty much pepper soup (with tomatoes). Its just that simple. 
Now, of course all that talk about light soup got me thinking about and hungry for some, and so I decided to make my own.


Heres what I used:
Ingredients

  • 3 ripe tomatoes
  • 1 onion (cut in half)
  • 3 scotch bonnet peppers
  • chicken wings
  • 2 garlic cloves
  • 1/2 a ginger root
  • 0.5 cups of water
  • 1 tbsp of tomato puree
  • 2 cubes of maggi chicken
  • 1 tbsp of salt (more if you want)
Instructions
  1. Wash the chicken wings and place them in a pot. Add the water and put over medium heat.
  2. Wash and add all the other ingredients (tomatoes, pepper, ginger, garlic, tomato puree, salt and maggi) into the pot with the chicken, and cover. Allow it to cook for about 10 minutes.
    The pepper, onions , garlic and ginger are added
    The tomatoes are added

    The maggi cubes (stock cubes) are being added

    The tomato puree is being added
  3. The tomatoes, onions, ginger and garlic would be tender now, take them out  of the pot with a spoon and put in a blender.
    The tomatoes, onions, ginger and garlic put into a blender
  4. Allow the chicken to cook properly. Once they are done, take them out of the pot, to prevent them from scattering inside the broth (this is done if the chicken is soft i.e not a broiler).
    The chicken is allowed to cook
  5. Then transfer the blended mixture back into the pot and allow it to cook for about 10-12 minutes.
    The blended mixture is added and allowed to cook
  6. Taste the soup and add more salt and seasoning if it needs more. You can also add some more water to the soup if it's becoming too thick. After all, its called 'light' soup.
  7. Serve with some fufu or any 'swallow' of your choice. The fufu is usually served in the same bowl as the soup, however, I kinda prefer mine in separate plates. Enjoy!!


Simple Sandwich Rolls

Hi Guys!

Hope you had an exciting week? So sorry the post is coming up a bit late, but better late than never right?

So, although I'm really trying to get onboard the fit-fam band wagon and all, I (like almost everyone else in the world) still love a good sandwich roll. I had some left over sausages in the fridge, but no bread rolls to eat it with, and thats when I had my little light bulb moment, why not make my own sandwich rolls? The inside would be milky and delicious and it would have a crunchy crust....kinda like a really short delicious baguette.
Its a really simply recipe, with just about 5 ingredients. Of course you'll probably have to do some waiting for the dough to rise, but apart from that, its incredibly easy and delicious. 
For this you would need:
Ingredients
Yeast, flour, sugar, salt and warm milk.
  • 1.5 tbsp of yeast
  • 1 cup of warm milk (can be substituted for water)
  • 2 cups of bread flour (all purpose would work too)
  • 1 tsp of Sugar (to feed the yeast)
  • 1 tsp of salt

Other things you'll need include:
  • 2 tbsp of oil
  • A knife
  • A baking tray
  • Parchment paper
  • A clean floured work surface
  • A bowl
  • A dough -hook attachment mixer (optional)

Instructions

  1. Put the yeast in a bowl and pour over the warm milk (or water) and sugar, and leave to activate for about 5 mins, then add the salt.
  2. Add the flour and begin to mix until a dough forms. The dough should come away from the bowl, and should be easy to pull away from the dough-hook.
  3. Transfer the dough onto the floured work surface, and knead for about 4 minutes.
  4. Grease the bowl with the oil, and transfer the dough to the oiled bowl. Rub the dough in the oil, cover with a clean kitchen cloth, and place in a warm place (inside a turned-off oven) for about 1 hour (or till it doubles in size).
    The dough has doubled in size
  5. Deflate the risen dough and place it on the work surface. Form the dough into a rectangle, and cut it into squares.
    The rectangular dough has been cut into squares
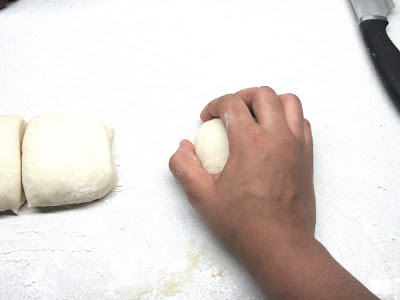
  6. Take each square and roll it around in-between your hand and the surface till it becomes a round ball. 
    Using my palm and the work surface to form a dough ball
  7. Transfer on to the baking tray, cover, and allow to rise for about 10 minutes. Now pre-heat your oven to 200 degrees celsius.
    Rolled dough balls
  8. Once its risen, take them and flatten each ball into a rectangle with your fingers.
    Used my finger to flatten the roll
  9. Then roll it up, and seal the edges.
    The flattened dough has been rolled
  10. Place the side of your palm on the edges and make into a pointed end. 
    The edges are pointy
  11. Do this for the rest of the dough ball, cover and allow to rise for another 15 minutes on the work surface.
  12. Before you put them in the oven, use the knife and make a straight line diagonally across the side of each dough roll (don't cut through the dough). Then spritz each roll with some water (this helps create a crispy skin).
    The diagonal slant is done, and the dough is has been spritzed 
  13. Place the rolls in the oven for about 25 minutes. Turn the tray around in the oven at the 10 minute mark to get an even crust on both sides.
  14. Once the rolls are brown and done, remove from the oven, and allow to cool a bit. (If your like me, you'll wait till its just luke-warm and smother some butter across it). Enjoy!!
    Fresh out of the oven


Tips

  1. You can tell that your yeast is spoilt if it doesn't get activated i.e it doesn't turn the liquid frothy after 5 minutes.

Sunday 24 January 2016

Roasted Mackerel with Garlic and Paprika, served on a bed of Coconut Rice.....Part 1

Hi Guys!!

Hope you had a great week?....I sure did! 

So, I was talking to a friend of mine during the week, about how much I miss home (Nigeria), and some of the things I can't wait to  sink my teeth into once I get back. She then told me about a nice restaurant here in Sheffield that served some delicious Nigerian cuisine, and how her brother had eaten some very tasty fried fish there. Zanzibar....I think she called it.  We eventually decided to go check it out next week.

I remember when I was much younger (probably still in primary school), my mum used to buy frozen mackerel, cut the fish into about 4-5 pieces, season it, and then fry it. Chai!....that thing was so delicious ehh. It was always either used in fish stew or just eaten by itself. I had some friends then who enjoyed their fried mackerel with some soaked garri....they too could literally swear by it. I think till today, fried mackerel still remains a  stable Nigerian delicacy.

However, for this recipe, we are going to take our mackerel up a notch or two ;-). Instead of being cut into 4-5 pieces (sorry mum), the mackerel is going to be filleted. 
Fillet from the french word 'filet', meaning a thread or strip, is the process of slicing away the flesh of the fish from the bones...gruesome huh. But it certainly does taste great.


First we are going to tackle the fish, then in the next post, we'll make the coconut rice.

For this you'll need:

Ingredients

  • 1 Mackerel 

For the spice rub
  • 1tsp of salt
  • 1tsp of smoked paprika
  • 1/2 tsp of garlic powder (or 1 clove of crushed garlic)
  • 1tsp of black pepper
The other things you'll need include:

  • A thin sharp knife
  • A small bowl
  • Parchment/baking paper
  • A baking tray
Instructions

  1. First, place your fish on a stable cutting board
  2. Cut a straight line from the neck into the belly of the fish, to the mid-section and remove the guts (just as much as you can).
  3. From the spine of the fish, cut a c-shape towards the back of the pectoral fin (beside the gill cover) all the way down to the neck. Do this on the reverse side too, and the head should come off easily. 
     
  4. Once the head is off, turn the fish around till the spine is facing you. Place the knife at the middle (where the head was removed), just before the bone, and place your second hand on the fish pressing down gently(to steady it). In one motion, slice through, till you get to the tail end.
  5. Do this on the opposite side, and you should be left with the vertebral column (with the tail attached) of the fish.
  6. Clean the sides of the fillet you weren't able to get to before (just cut it out), and if you had any bones stuck in the middle, make a v-shape in the middle of the fish with your knife (making sure your knife doesn't go through the skin) and cut it off.
  7. Carefully run your fingers through the fillets to ensure theres no more bone. Then run some water through the fillets, to clean them. Pat dry with a paper towel.
  8. In a small bowl, combine the spices (salt+ pepper+garlic+paprika) together.
  9.  Rub the spice mix all over the fleshy part of the fish. Then leave to marinate for about 20 minutes
  10. Its actually at this point that you start making the coconut rice, but lets leave that for the next post and return to our fish. The fish should however be put into the oven once you're about to serve the rice (so its still hot and juicy).
  11. Pre-heat the oven to 180 degrees celsius. Place the fish on the baking sheet lined with parchment/baking paper (skin side up). Sprinkle some salt on the skin, and then put it in the oven to roast for about 15 minutes.
  12. Remove from the oven and place on your rice (skin side up), and then... enjoy.

Tips

  • Try to ensure that your knife is very sharp, or else you won't be able to fillet the fish in single slice motion.
  • Try not to move the knife blade too much when filleting the fish, or it would make rough cuts and take off less flesh (leaving a lot more flesh on the vertebral column).

Saturday 23 January 2016

Chewy Nerdy/Emoji Chocolate Chip Cookies

Hi Guys!!!

Hope you had a great week?...I know I did. 

Today, we would be making a batch of my chewy nerdy chocolate chip cookies. Yes guys, you read that right...Nerdy! It's such a simple recipe, but it's definitely guaranteed to blow your mind. 

I'm talking about the beautifully crunchy brown exterior, and the gooey-chewy interior with those delicious milk chocolate-chips, c'mon need I say more? And of course, you can play around and decorate it anyhow you want. From children's birthday parties to science conventions, you are the Judge Judy of your cookie. 


I've decided to go the nerdy/emoji route though, so for this you'll need:

Ingredients

  • 1.5-2 cups of all purpose flour
  • 3/4 cup of room temperature butter
  • 1tsp of bicarbonate soda
  • 1 whole egg & 1 yolk
  • 1 cup of packed ground brown sugar
  • 1/2 cup of white ground sugar
  • 1 Tbsp of Vanilla extract
  • 1 tsp of salt
  • 1/2 tsp of cinnamon+nutmeg+ginger (optional)
  • 1 cup of chocolate chips (or just chop any chocolate bar of your choice into small chips)
Some other things you might need include
  • 2 clean bowls
  • A baking tray
  • A piping bag (or just a regular transparent bag)
  • An electric mixer (a plastic spatula or wooden spoon is also fine)
  • Parchment paper/ baking sheet for lining the baking tray (a knob of butter can also be used to grease the tray) 
  • A pair of scissors
  • An ice cream scoop or teaspoon
Instructions
  1. Pre-heat the oven to 200 degrees celcius and line the baking tray with parchment paper, or grease it with the knob of butter.
  2. Put the softened butter, brown and white sugar into the bowl.
  3. Mix them all together; creaming the butter and sugar can be done with the spatula, spoon or electric mixer.
  4. Creamed butter and sugar
  5. In a separate bowl, sieve the flour, salt and bicarbonate, and set it aside, this makes up the dry ingredients.
    Flour, salt and bicarbonate
  6. Add the whole egg, mix, then add the yolk into the creamed butter and sugar and mix that well. Add in the vanilla extract and other spices (optional) and mix it in well too. This makes up the wet ingredients.
    The yolk added to the creamed butter and sugar
  7. Now gradually add the dry ingredients into the wet, and mix.  It should form a some-what sticky dough (that just comes away from the bowl when mixed). Then add half the chocolate chips and incorporate it into the dough.
    Adding the chocolate chips into the cookie dough
  8. Time to make our individual cookies. Using the teaspoon, take a scoop of your cookie dough and roll it into a ball in-between your palms. Place it onto the baking sheet or on the greased baking tray. 
  9. Ensure you leave some space after each ball, as the cookie would certainly spread out. Do this for the remaining dough, until its all finished.
  10. Now, gently press each rolled ball down on the sheet, so it looses its ball-like shape and looks a bit squished.
  11. Place this into the pre-heated oven, and allow to bake for about 10minutes or until the edges turn brown (the middle would be chewy).
  12. When the cookies are done, remove them from the oven and place them on the work surface and allow it to cool.
    The cookies are fresh out of the oven
  13. Melt the remaining half of the chocolate chips in the microwave and scoop it into the side of a plastic bag. Using the scissors, snip the end of the bag, and draw what ever you like on your cookie.
  14. Allow the chocolate to harden, and then you can enjoy your cookies with a glass of milk.
Tips
  • Ensure that when you add the egg and yolk, you mix it well at one spot before incorporating the whole. This would prevent the butter, sugar and egg from splitting and looking funny.
  • Depending on how you want your cookie, you can either leave it for 10minutes to be chewy or 13 minutes to be more crispy.
  • Ensure your cookies have cooled down a bit before you begin drawing the chocolate over it. This would prevent the chocolate from melting away because of the hot cookie.
  • While melting the chocolate in the microwave, do it at intervals of 5-10 seconds, bring it out and stir. This would prevent your chocolate from burning. It is also a way to temper the chocolate, to ensure it remains solid at room temperature. 


I would like to give a big shout out to '+Tomiwa Adekunle' for trying out the Nigerian Meat-Pie recipe. She said it turned out great and delicious. 

Do share your recipes and pictures with me when you make them, I would certainly love to see how yours turned out. 

You can also either leave me a comment on the blog or just #mzeleanorskitchen on Facebook and Instagram, and I'll definitely check it out. 


Monday 18 January 2016

The Infamous Nigerian Meat-Pie .....Part 2

Hi Guys!!

Welcome to the second half of our Nigerian meat-pie journey. If you haven't read the first half about how to make the meat filling, go ahead and do that now....don't worry, I'll wait :-)


Now lets get started on the second half of our meat pie.

You'll need
  • One stick of room temperature butter 
  • 300g of self-raising flour (300g of all purpose flour + 1Tbsp of baking powder)
  • 1/2 cup of cold water
  • 1 teaspoon of salt
  • 1 teaspoon of black pepper
  • 1 beaten egg  (for egg-wash)
Some other items you'll need are:
  • A rolling pin
  • A large cookie cutter (or a small plastic cup or anything you can use to cut out circles from the dough)
  • A clean and dry work surface
  • A knob of butter to grease the baking tray
  • A baking tray
  • A clean bowl
  • A pastry brush
  • A fork
  • A teaspoon
Instructions
  1. In the clean bowl, combine the flour, salt and black pepper together. Then add the softened butter.
  2. Using your fingers, rub/massage the butter into the flour/dry ingredients. Make sure that the butter doesn't remain visible, but has been worked into the flour. After doing this, it should come together when pressed in your palm, and just crumble away.
  3. Gently/ gradually add some of the cold water into the flour mixture, folding it in with a spatula (I prefer to use my hands though), as you do, until it forms a dough. 
  4. Kneed the dough on a floured work surface for about 3 minutes, until you are comfortable with it. Then allow it to rest for 5 minutes.
  5. Preheat your oven to 200 degrees celsius. Using the knob of butter, grease the baking tray and set aside.
  6. Flour the work surface, and using the rolling pin, roll-out the dough. Use the cookie cutter to cut-out some circular shapes with the dough.

  7. Now, using a teaspoon, take some of the meat filling, and place it in the centre of the cookie-cut dough. 
  8. Place your index finger in the egg wash and rub it round he rim of the cookie-cut dough. This would act as the glue.
  9. Take the second end of the dough and fold it over the meat filling. Press the fork around the edges to seal the other end in place. 
  10. Transfer the sealed meat-pie onto the greased tray and repeat the process until you've exhausted all the filling and dough.
  11. Using the pastry brush, brush the egg wash onto each meat pie  on the tray (this gives the pie its signature golden brown colour).
  12. Transfer the tray into the pre-heated oven, and allow it to bake for 12-15 minutes.
  13. Once its golden brown and done, remove from the oven and allow to cool for a while.


Tips
  • Be careful not to add too much water into the flour mixture, as this can change the consistency of your dough, and make it  quite soggy. If that happens, you'll need to add some more flour.
  • Try to roll the dough out thinly (not too thin that it begins to tear off when sealed ohh!), but just thin enough so that as you bite into it, you don't have a mouthful of pie without the meat. Theres nothing worse that chewing on a doughy meat-pie.